
This easy recipe for peanut butter protein cups combines rich chocolate with a creamy, protein-packed center for a deliciously satisfying snack.
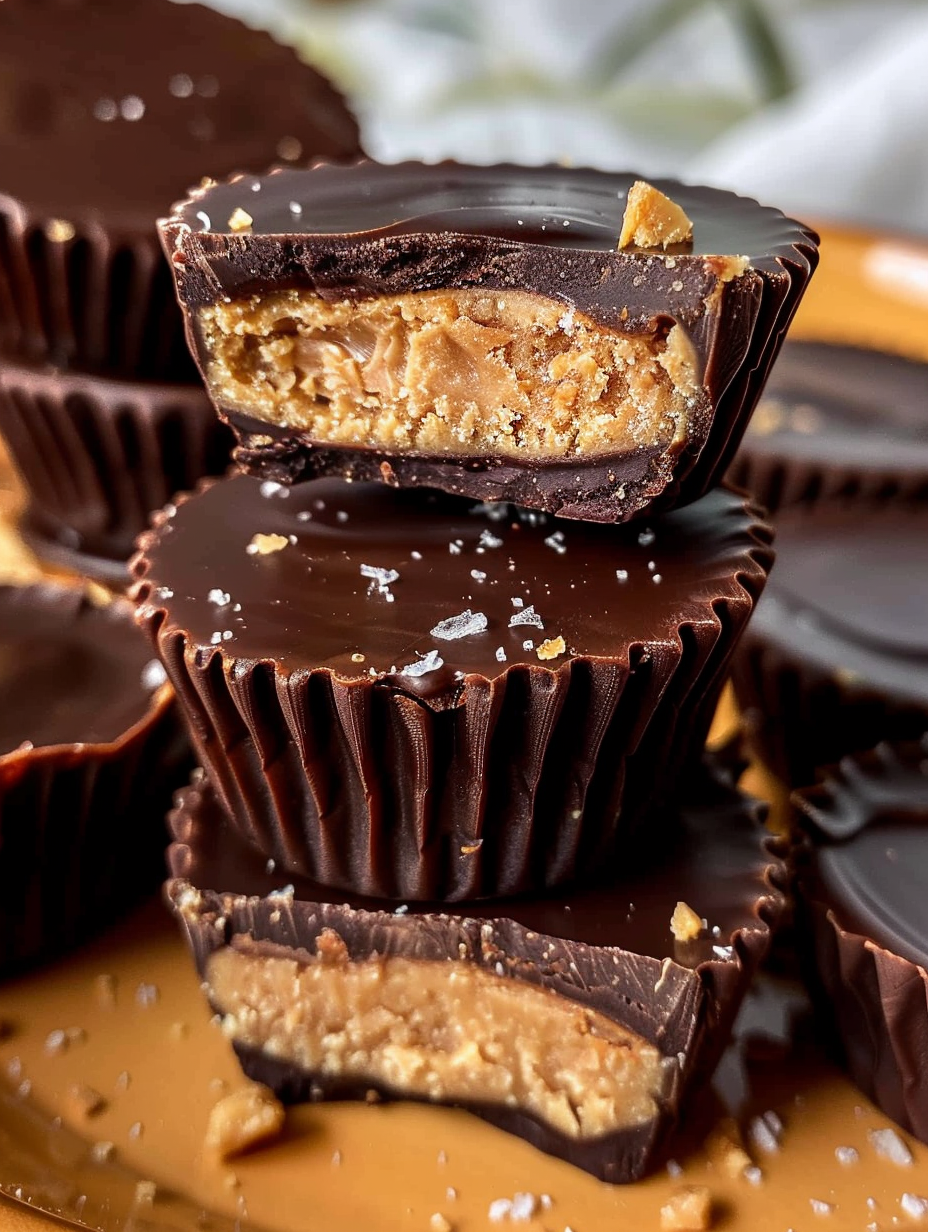
Whether you need a post-workout treat or a healthy dessert option, these homemade cups are perfect.
They require no baking, use simple ingredients, and store perfectly in your fridge or freezer.
Why Make This Recipe: The Perfect Protein-Packed Sweet Treat
You should make this recipe because it transforms your standard candy craving into a nutritious, muscle-fueling snack in under 30 minutes. Forget store-bought options loaded with extra sugars and oils; these homemade peanut butter protein cups deliver a powerful 7 grams of protein each, using clean ingredients like natural peanut butter and protein powder.
They are the ideal solution for anyone looking for a quick, high protein dessert that actually satisfies a sweet tooth. For another fantastic frozen high-protein treat, you must try our simple protein ice cream.
Smart Ingredient Choices
Using natural peanut butter provides healthy fats and fiber. Pure maple syrup adds a touch of natural sweetness without refined sugars. The protein powder, whether plant-based or whey, is the key to boosting the nutritional profile, making these cups a legitimate part of your fitness nutrition plan.
How to Make Peanut Butter Protein Cups: A Foolproof Guide
Create your cups by first making a simple peanut butter filling, then layering it with melted chocolate in a muffin pan. The process is straightforward and requires no special skills, just a microwave and a few minutes of hands-on time. Begin by gently melting your peanut butter until it’s runny. This makes it much easier to stir in the protein powder and maple syrup thoroughly, preventing a dry or crumbly mixture.
If you love the combination of chocolate and a gooey center, our decadent chocolate lava cake is a baked dessert you’ll adore.
Forming the Perfect Filling Disc
Use a tablespoon cookie scoop to portion the filling. Roll each scoop into a ball, then gently press it into a flat disc. Aim for a diameter of about 1.5 inches so it fits neatly inside your muffin cup with a chocolate border. Place these discs on a plate and set them aside while you prepare the chocolate.
Mastering the Chocolate Layer
The secret to a smooth, snappy shell is melting the chocolate chips with a bit of coconut oil. Microwave in short 30-second bursts, stirring well after each, to avoid seizing or burning the chocolate. The coconut oil helps the chocolate melt evenly and sets with a beautiful gloss.
| Nutrient | Amount Per Serving (1 cup) |
|---|---|
| Calories | 240 calories |
| Total Fat | 16 g |
| Carbohydrates | 18 g |
| Fiber | 3 g |
| Sugar | 12 g |
| Protein | 7 g |
| Sodium | 8 mg |
Customize Your Protein Cups: Flavor Variations & Dietary Swaps
Customize your cups easily by swapping ingredients to match your taste or dietary needs, ensuring you always have a delicious option on hand. This recipe is incredibly flexible. For a dairy-free version, simply use vegan chocolate chips and a plant-based protein powder. You can also use almond butter or sunflower seed butter instead of peanut butter for a nut-free alternative.
For a creamy, protein-rich dessert in a different form, explore our high-protein Greek yogurt cheesecake.
Creative Flavor Boosters
Stir a pinch of cinnamon or a dash of vanilla extract into the peanut butter filling. For a crunchy texture, mix in chopped nuts or a sprinkle of oats. Top the cups before freezing with flaky sea salt, crushed pretzels, or even a few dried fruit pieces for extra flavor and texture.
Storage, Freezing, and Meal Prep Tips
Store your finished cups in an airtight container in the refrigerator for up to 5 days or in the freezer for up to 3 months, making them a perfect make-ahead snack. These peanut butter protein cups are a meal prep superstar.
Making a double batch ensures you have a healthy dessert or snack ready for the entire week. They are portable and don’t require reheating, making them ideal for lunchboxes, gym bags, or a quick bite at your desk.
Freezing for Longevity
Place the set cups in a single layer on a baking sheet to freeze initially for one hour. This prevents them from sticking together. Then, transfer them to a freezer-safe bag or container. They can be eaten straight from the freezer for a firmer, ice cream-like texture, or thawed for a few minutes for a softer bite.
Frequently Asked Questions (FAQs)
Can I use milk chocolate instead of dark chocolate?
Absolutely. You can use milk chocolate chips, but be aware they are often sweeter and may set slightly softer than dark or semisweet chocolate. The coconut oil will still help them set properly.
My filling is too dry or crumbly. What went wrong?
This usually happens if the peanut butter wasn’t melted enough or if you’re using a very absorbent protein powder. The fix is simple: add an extra teaspoon of maple syrup or a tiny splash of milk (dairy or plant-based) and mix until it comes together into a pliable dough.
Do I need a silicone muffin pan?
A silicone pan is highly recommended because it makes removing the set cups incredibly easy—they just pop out. If using a metal pan, paper liners are essential to prevent sticking.
This recipe for peanut butter protein cups is your ticket to enjoying a classic candy in a whole new, healthier way. With high protein, simple ingredients, and endless customization, it’s a dessert you can feel great about eating anytime.
The Recipe
Print
Peanut Butter Cups
- Prep Time: 15 min
- Cook Time: 0 min
- Total Time: 15 min
- Yield: 12 servings 1x
- Category: Dessert
- Method: No-Bake
- Cuisine: American
- Diet: Vegetarian, Can be Dairy-Free, Can be Vegan
Description
Easy, no-bake chocolate cups with a creamy peanut butter and protein powder filling. A healthy, high-protein dessert or snack ready in minutes.
Ingredients
⅔ cup natural creamy peanut butter
⅓ cup vanilla protein powder (30 g), plant-based or whey protein powder
2 tablespoons pure maple syrup
1 (10 ounce) bag semisweet or dark chocolate chips, use vegan chocolate chips for dairy free
2 teaspoons coconut oil
Flaky sea salt, optional
Instructions
- To a small microwave-safe bowl, add the peanut butter. Microwave until the pb has a runny consistency, 20-30 seconds. Add the protein powder and maple syrup; stir well to combine.
- Using a 1-tablespoon cookie dough scoop, scoop the peanut butter mixture into 12 portions. Gently flatten each portion into a small disc that will fit into the bottom of the muffin pan cups (about 1 ½ inches diameter). Transfer the peanut butter discs a plate and set aside until Step 5.
- To a small microwave-safe bowl, add the chocolate chips and coconut oil. Microwave in 30-second increments, stirring between each one, until the chocolate is melted. (TIP: watch carefully so as not to overcook and burn the chocolate.)
- To the cups of a 12-cup silicone muffin pan (or a metal muffin pan with paper liners), use a spoon to place a scant one tablespoon of melted chocolate in each muffin well. With the back of the spoon, spread the chocolate out so that it evenly coats the bottoms of each cup or paper liner.
- Place one peanut butter disc in the center of each muffin well.
- Top the peanut butter disc in each cup with an additional 1 tablespoon of the melted chocolate. Swirl the chocolate gently with the back of the spoon to evenly cover the peanut butter.
- Sprinkle tops with flaky sea salt, if desired. Place the muffin pan in the freezer until chocolate is set, at least 15 minutes.
- Remove from the freezer and gently remove each peanut butter cup from the pan. Store in an airtight container in the fridge for up to 5 days or in the freezer for up to 3 months.
Notes
- For a nut-free version, use sunflower seed butter.
- Ensure peanut butter is runny before mixing to prevent a dry filling.
- A silicone muffin pan is highly recommended for easy removal.
Nutrition
- Serving Size: 12 servings
- Calories: 240 calories
- Sugar: 12 g
- Sodium: 8 mg
- Fat: 16 g
- Saturated Fat: 6 g
- Trans Fat: 0 g
- Carbohydrates: 18 g
- Fiber: 3 g
- Protein: 7 g
- Cholesterol: 0 mg